What's in this tutorial?
이 튜토리얼에서는 GraphQL과 source 플러그인들을 이용해 Gatsby 사이트로 데이터를 불러오는 방법을 배울 것이다. 이런 플러그인들을 배우기 전에 GraphiQL이라고 불리는 당신의 쿼리들을 올바르게 구조화할 수 있도록 도와주는 툴에 대해 알고 싶을 것이다.
Introduction GraphiQL
GraphiQL은 GrapheQL IDE(Integrated Development Environment)이며, Gatsby 사이트를 만들면서 자주 사용할 강력한(여러 면에서 놀라운) 툴이다.
사이트의 개발 서버가 실행되고 있는 동안에는 일반적으로 http://localhost:8000/___graphql 주소로 접속할 수 있다.
여기 내장된 site 를 입력해서 거기에 어떤 필드들이 가능한지 보자 - 이미 질의했던 siteMetadata 객체를 포함해서. GraphiQL을 열어서 당신의 데이터로 이것 저것 해보자! Ctrl + Space(혹은 대체키로 Shift + Space)를 눌러 자동 완성 팝업을 띄우고 Ctrl + Enter를 입력해 GraphQL 쿼리를 실행해보자. 나머지 튜토리얼에서 GraphiQL을 더 많이 사용하게 될 것이다.
Source Plugins
Gatsby 사이트의 데이터는 어디에서든 올 수 있다: APIs, databases, CMSs, local files, etc.
Source plugins은 그들의 소스로부터 데이터를 가져 온다. 즉, 파일 시스템 source plugin은 어떻게 파일 시스템에서 데이터를 가져오는지 안다. WordPress 플러그인도 어떻게 WordPress API를 통해 데이터를 가져오는지 안다.
gatsby-source-filesystem을 추가하고 어떻게 동작하는지 알아보자.
첫번째로 프로젝트의 루트에서 플러그인을 설치하자.
npm install --save gatsby-source-filesystem그리고 gatsby-config.js 파일에 추가하자.
module.exports = {
  siteMetadata: {
    title: `Pandas Eating Lots`,
  },
  plugins: [
    {
      resolve: `gatsby-source-filesystem`,
      options: {
        name: `src`,
        path: `${__dirname}/src/`
      }
    },
    `gatsby-plugin-emotion`,
    {
      resolve: `gatsby-plugin-typography`,
      options: {
        pathToConfigModule: `src/utils/typography`,
      },
    },
  ],
}
저장하고 개발 서버를 재시작하자. 그리고 GraphiQL을 다시 열어보자.
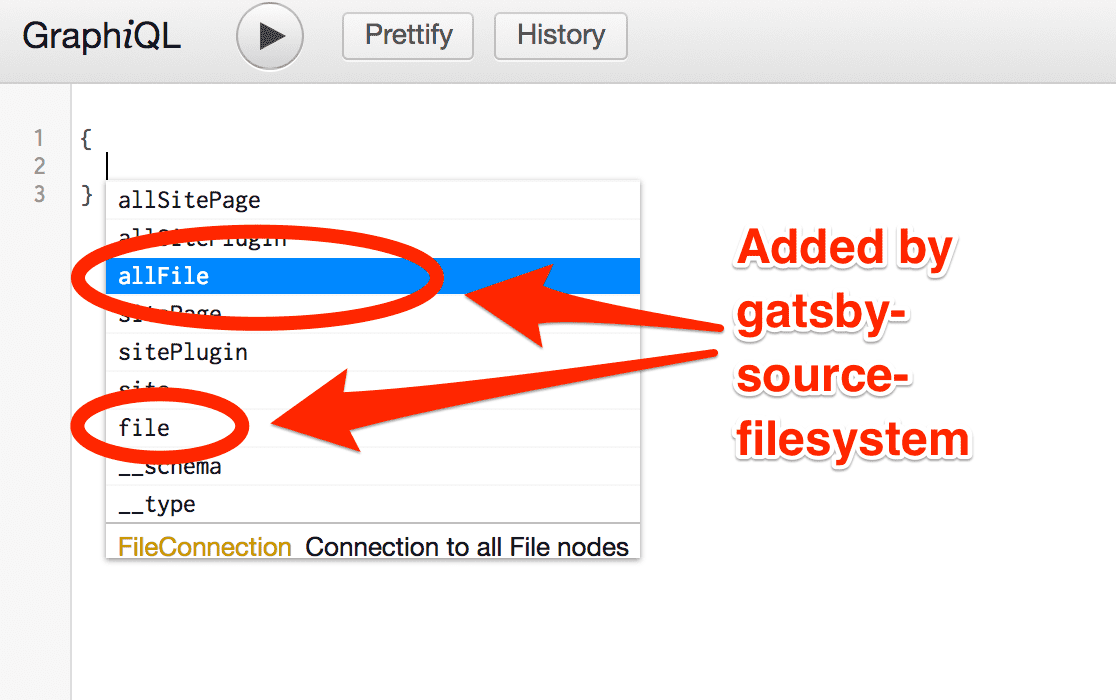
자동 완성 팝업을 띄우면, gatsby-source-filesystem이 추가한 allFile과 file을 보게 될 것이다.
allFile에서 Enter를 치고 Ctrl + Enter를 입력해 쿼리를 실행해보자
쿼리에서 id를 삭제하고 다시 자동 완성 팝업을 띄워보자 (Ctrl + Space)

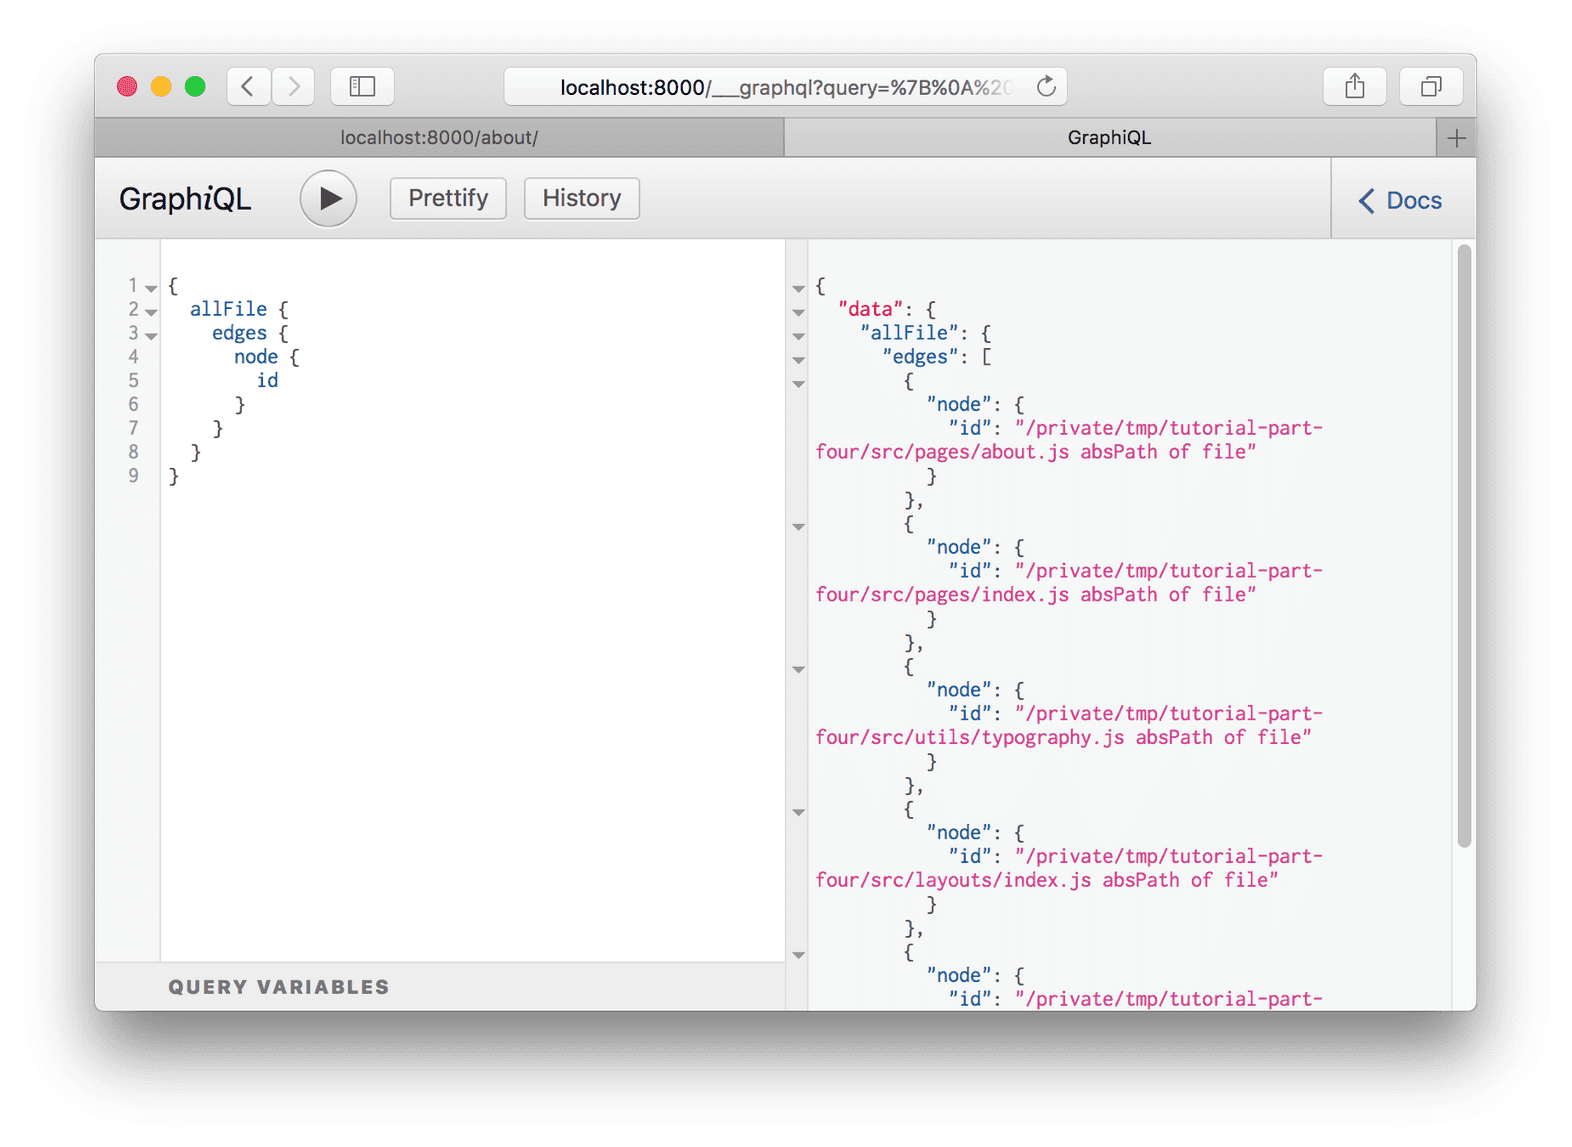
몇 가지의 필드들을 쿼리에 추가하며 Ctrl + Enter를 입력해 쿼리를 매번 재실행해보자. 이것과 비슷한 화면을 보게 될 것:

결과는 파일 "nodes"(node는 "graph" 내부 객체의 fancy한 이름!) 의 목록이다. 각각의 파일 객체는 당신이 쿼리했던 필드들이 있다.
Build a page with a GraphQL query
Gatsby에서 새로운 페이지를 만드는 것은 종종 GraphiQL에서 시작된다. 먼저 데이터 질의문을 GraphiQL에서 그려보고 UI를 만들기 위해 이걸 React page component에 복사한다.
한 번 해보자.
방금 만든 allFile GraphQL 쿼리와 함께 src/pages/my-files.js 파일을 만들자.
import React from "react"
import { graphql } from "gatsby"
import Layout from "../components/layout"

export default ({ data }) => {
  console.log(data)
  return (
    <Layout>
      <div>Hello world</div>
    </Layout>
  )
}

export const query = graphql`
  query {
    allFile {
      edges {
        node {
          relativePath
          prettySize
          extension
          birthTime(fromNow: true)
        }
      }
    }
  }
`
위의 console.log(data) 라인이 강조되었다. 새로운 component를 만들 때 GraphQL 쿼리로부터 얻은 데이터를 콘솔에 찍어보는 건 종종 도움이 된다. UI를 만드는 동안 브라우저의 콘솔에서 데이터를 파악할 수 있다.
/my-files/에서 새로운 페이지에 접속하고 브라우저의 콘솔을 열면 이런 걸 볼 수 있을 것:
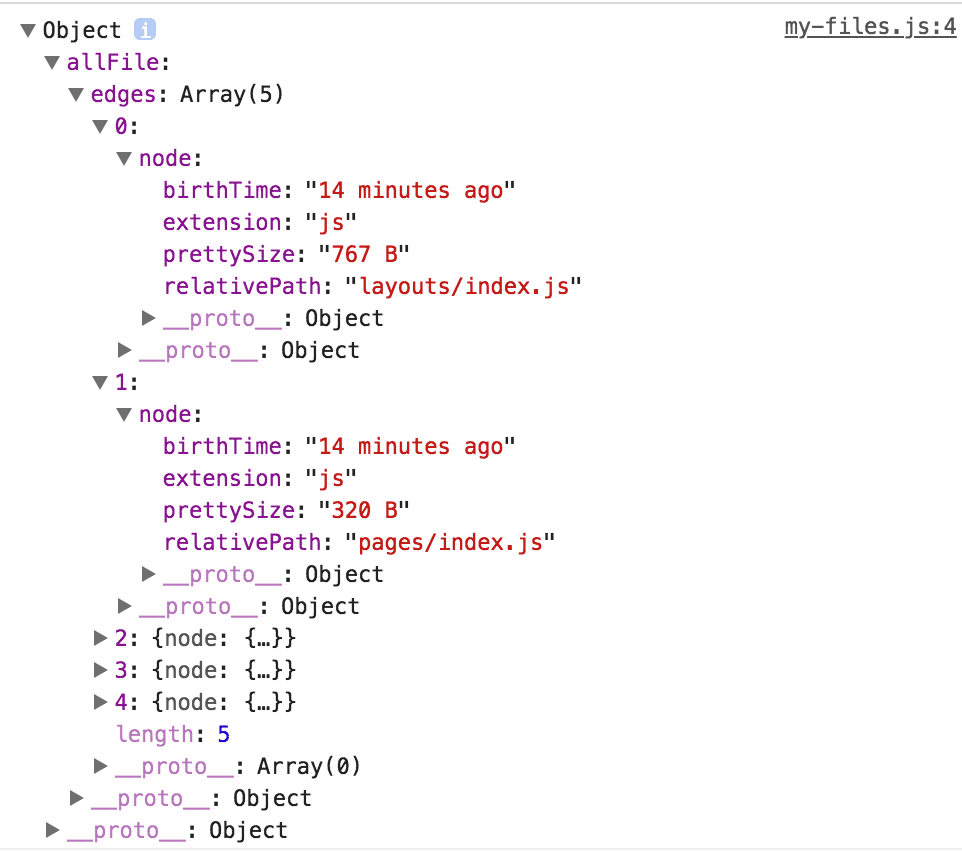
데이터의 구조는 GraphQL 쿼리의 구조와 일치한다.
파일 데이터를 출력하기 위해 약간의 코드를 component에 추가하자.
import React from "react"
import { graphql } from "gatsby"
import Layout from "../components/layout"
export default ({ data }) => {
console.log(data)
return (
<Layout>
<div>
<h1>My Site's Files</h1>
<table>
<thead>
<tr>
<th>relativePath</th>
<th>prettySize</th>
<th>extension</th>
<th>birthTime</th>
</tr>
</thead>
<tbody>
{data.allFile.edges.map(({node}, index) => (
<tr key={index}>
<td>{node.relativePath}</td>
<td>{node.prettySize}</td>
<td>{node.extension}</td>
<td>{node.birthTime}</td>
</tr>
))}
</tbody>
</table>
</div>
</Layout>
)
}
export const query = graphql`
query {
allFile {
edges {
node {
relativePath
prettySize
extension
birthTime(fromNow: true)
}
}
}
}
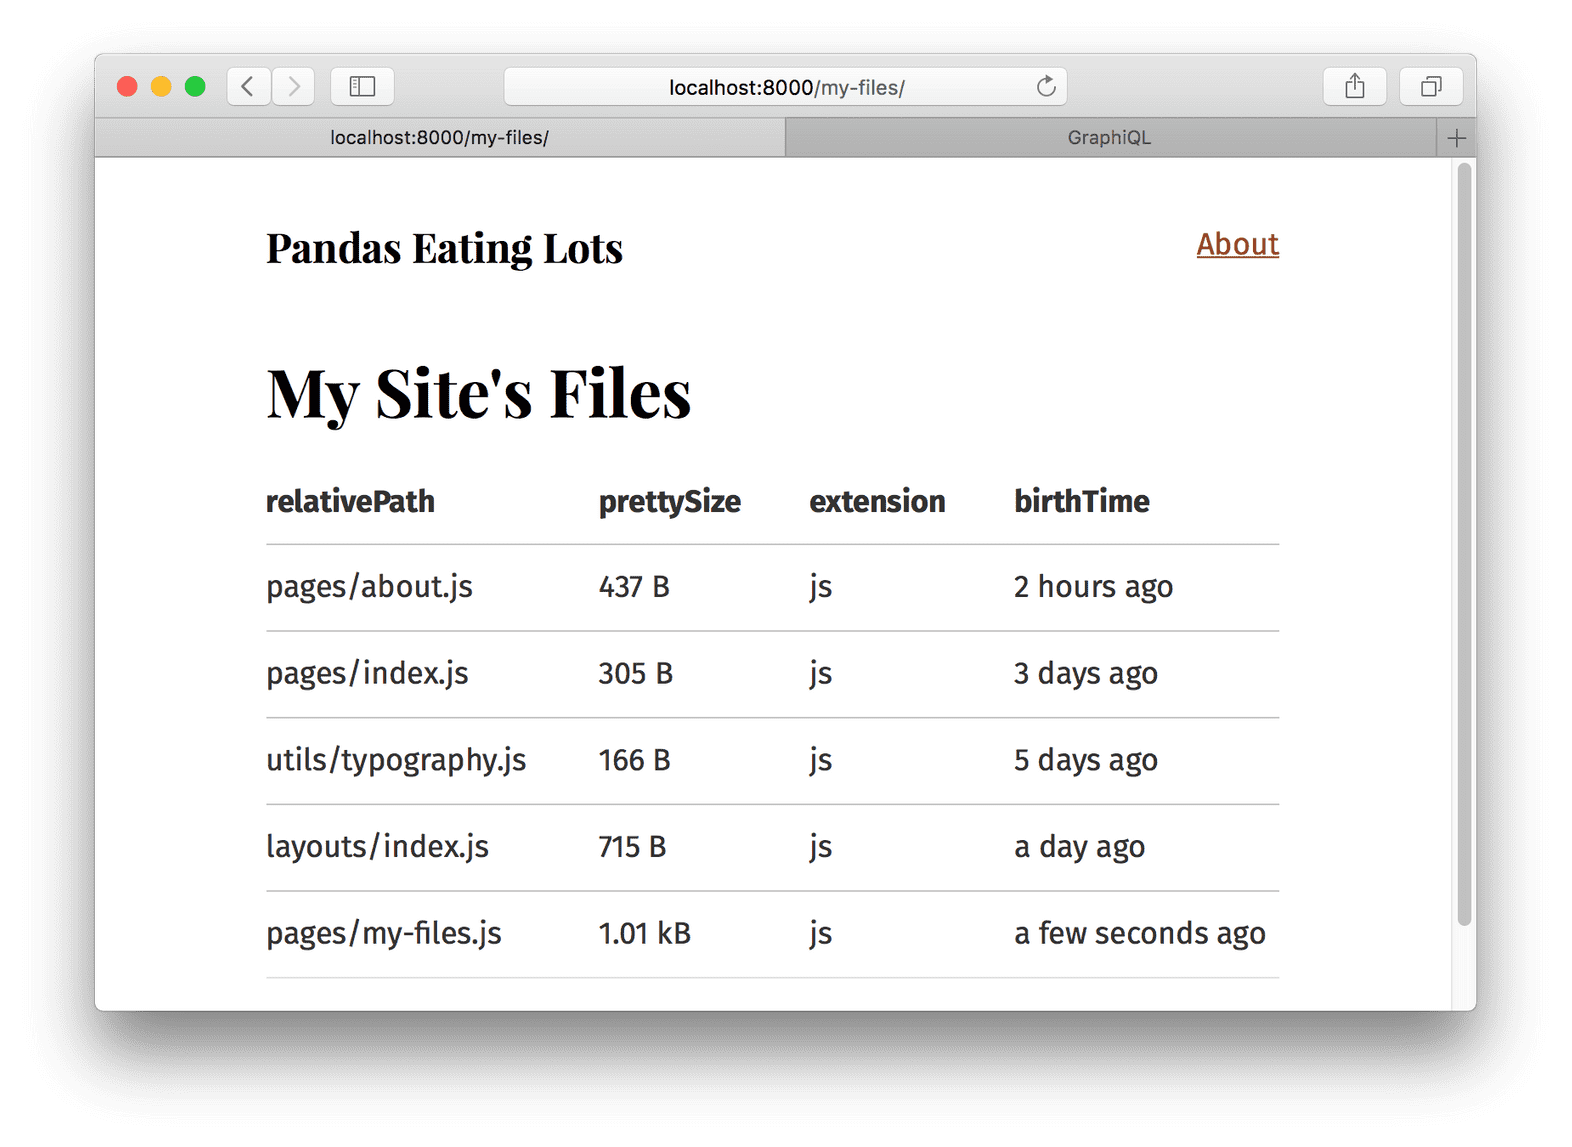
`그리고...😲
'Dev > Translation' 카테고리의 다른 글
| [Gatsby] Tutorial - 7. Programmatically create pages from data (0) | 2019.08.14 |
|---|---|
| [Gatsby] Tutorial - 6. Transformer plugins (0) | 2019.08.02 |
| [Gatsby] Tutorial - 4. Data in Gatsby (0) | 2019.07.30 |
| [Gatsby] Tutorial - 3. Creating nested layout components (0) | 2019.07.29 |
| [Gatsby] Tutorial - 2. Introduction to styling in Gatsby (0) | 2019.07.29 |